

I’ve had an outrageous streak of luck, lately. Firstly, I got a lovely plug from BoingBong (via the additionally lovely Xeni Jardin) that introduced a whole slew of new people to my store. Secondly, an event I’ve been hosting over at my shop, Craft Night, has been drawing an incredible crowd of excellent makers. It’s starting to feel like I’ve got a genuine tribe here in the city. Thirdly, I’ve finally been able to experiment with a technology I’ve been talking about and sketching for years: soft robots.
My friend, the extraordinary jeweler, maker, and programmer Aaron Waychoff, introduced me to Jim Bredt. Jim is many things. He moonlights as the human spotlight at the Ignobel Awards. He’s a metal smithing, mold making, 3d printing, material scientist, MIT professor. He also won an award for being a major ball buster when he taught “Introduction to Solid State Chemistry”.

Jim is one of the founders of ZCorp, a powder-based 3d printing company, and now runs a startup called Veridis3D. They concoct powders, materials, and fabrication methods for printing. They have a small lab in a mysterious building on the north end of Somerville where the magic happens.
I’d been shopping the idea of printing disposable molds with soluble cores and infiltrating them with silicone for years. The whole pitch is that you might be able to create complex geometry of almost any configuration as voids in a silicone skin. With the right material, you could soak the whole assembly in water and be left with a complex silicone robot, only needing a few hoses and fittings to get up and walk.
Of course, this is an entirely simplistic and sunny view of what at the least will be an enormously complex development process, but I have been desperate to at least hack on it for the better part of five years. Now, I have finally gotten the chance.
I’m going to be releasing the patterns, materials, and methods I’m using as openly and as often as possible. My major concern with this is getting new methods and routes for experimentation out into the world so the technology can push forward as a whole. Jim and the folks at Veridis have been super open and flexible when it comes to the behind-the-scenes mojo that powers their technologies. As long as I don’t reveal mission critical stuff about their formulas, I’m free to photograph, document, and disclose everything I’m working on, which is unspeakably generous of them.
As of yet, I haven’t decided what licenses are best for these designs and where to release them. I’m currently considering a completely open license with attribution, but need to talk with some experts to know how to keep things hackable and happy. I’ll likely start out piling files on to Thingiverse, releasing documentation here, and uploading a stream of process photos to Flickr.
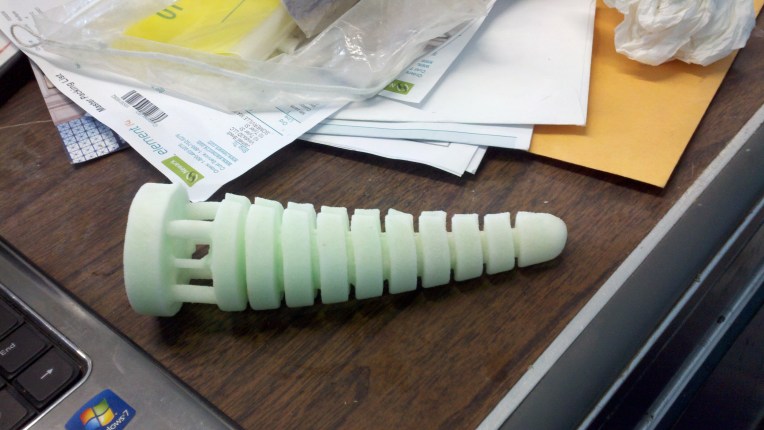
So, without further adieu, here’s what a day of CAD and two days of hacking has yielded:

Yup, it’s an odd, tapered tentacle. So, what’s inside it?

The striations are there to constrict the expansion laterally so that, when it’s inflated, that half of the tentacle rolls over instead of turning into a random inflated balloon. The goal here is to create a gripper or flexor, or at least get some predictable mechanical motion.

Yup, there’s your problem. Holes in the central manifold. Alas. Well, I’m trying to patch it to see. I think these kinds of problems can be taken care of by putting some bridges on the original form that get clipped away once it’s been toughened with sealer. This would keep the walls from getting too close together. The air bubbles might be drawn away with either vac or pressure casting.
Here’s a view of the internal print. The mold is generated by taking a model of the final skin I want to produce, subtracting it from a solid block, and dividing the geometry into sections to be molded. Eventually I’m hoping to streamline this whole process, but there needs to be a lot of hacking and experimentation before I get to that point. This one was printed in PVA and sealed with wax, which ended up being a messy process both getting everything prepped and getting everything out of the silicone skin. I believe corn starch sealed with shellac will prove a less frustrating casting medium.

Here are some cores along with an early materials test with some less than stellar brush-on rubber. I think hunting down a high tear strength RTV rubber is essential for getting this right. It’s also got to have a low viscosity to properly eject bubbles and a slow gel time. Possibly Mold-Max or similar.

Here’s CAD of the original long, thin tentacle concept. In retrospect, this was an overly ambitious first attempt, but progress often happens in little strides. After seeing the initial prints snap and warp, I bulked up the model and shortened it substantially. Currently we’re getting some reasonable prints with much less distortion. I’m eager to head back to the lab ASAP to hack on these again.

Jim also had the idea of casting the internals using wax poured in to corn starch molds. This seemed to work really well. I’m a little hesitant to pursue this method too far, as it seems limited to geometry that can be cleanly divided and poured flat, which would prevent me from doing diffusion-limited or Laplacian patterns, but is definitely worth pushing further to see what we can get out of it.
So, there you have it. Two days of hacking, one day of CAD, and a whole lot of printing. The iteration process here is stellar. Being able to print multiples and small variations in batches has been super useful, especially when the first model you dig out of the powder snaps in your eager hands. Hopefully I can get back to Cambridge sometime next week for further experimentation and fiddling.